What Do You Need for a Heat Press Machine?
You need a heat press, a teflon sheet, a press pillow and your transfer material. Add a heat-resistant work surface and a way to keep the press stable and level, then dial in the temperature and pressure for your fabric and vinyl.
On this page (11 sections)
- What do you need for a heat press machine before the first project?
- Which accessories are truly essential and which are optional?
- How does a teflon sheet fit into a heat press setup?
- When should you use a heat press pillow?
- What transfer materials and supplies should you have on hand?
- How do you set temperature and time on a heat press?
- How much pressure does a heat press need for a clean transfer?
- What kind of work surface and setup does a heat press need?
- Which fabrics and blanks can you press safely?
- How do you keep the press and accessories in good condition?
- What do you need for a heat press machine when you start small?
You need a heat press, a teflon sheet, a press pillow and your transfer material, plus a flat, heat-resistant work surface. That short list covers what you need for a heat press machine to run its first shirt safely.
Everything else either protects the press, helps the design stick evenly or keeps the work area clean. The order below starts with the press and works through the accessories that make the biggest difference.
If you haven't pressed anything yet, what can you make with a heat press is a good next read, because the project you pick shapes which extras matter.
What do you need for a heat press machine before the first project?
The essentials are a press with a flat platen, a teflon sheet, a press pillow and your transfer paper or vinyl. A stable table and a small amount of spare heat-resistant tape round out the basic kit.
Start with the machine. A digital press with adjustable temperature and time takes the guesswork out of early projects.
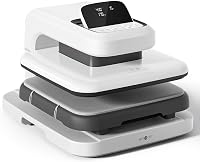
The Fancierstudio 15x15 is the kind of base most beginners want, because it covers shirts and flat blanks without a huge footprint.
Its platen has a Teflon coating already, so your first press arrives ready to protect itself. Temperature goes from 0 to 699 °F and the timer runs from 0 to 999 seconds, which covers HTV, sublimation and most craft transfers.
The silicon-gel base board and adjustable pressure let you set the pressure for each material.
Then add the protective layer. A teflon sheet goes over the design or under the platen to keep dye and adhesive off the press.
A press pillow raises thick seams and zippers so the design gets even contact. Those two accessories prevent the most common beginner mistakes.
Transfer paper or vinyl comes next, matched to your design. HTV for fabric, sublimation paper for poly-blend blanks and printable transfer paper for cotton all behave differently.
Rule: buy the press first, then add sheets and pillows before your first transfer, not after your first ruined shirt.
Which accessories are truly essential and which are optional?
The truly essential items are a teflon sheet, a press pillow, your transfer material and a heat-resistant work surface. Optional extras like spare tape and a thermometer make life easier but won't stop a project from working.
The essentials share one job: keeping the design and the press safe from each other. A teflon sheet protects the platen from ink, glue and scorch marks.
A press pillow supports seams and thick edges so the heat and pressure reach the print evenly.
The short essential kit
- A digital heat press with adjustable time and temperature.
- A teflon sheet large enough for your biggest design.
- A press pillow set for sleeves, seams and collars.
- Your HTV, sublimation paper or transfer paper.
- Heat-resistant tape for holding a design in place.
The useful extras
A thermometer helps you trust your press temperature. Spare teflon sheets mean you're not stuck when one gets marked.
A lint roller keeps dust and fibers off fabric before pressing. A heat-resistant mat protects the table.
The extras are cheap and worth adding over time. None of them replace the core kit, though.
A press without a sheet or pillow gives uneven results on collars and seams.
Some projects need a specific extra more than others. A sublimation mug setup needs a mug attachment, not a flat pillow.
A multi-color screen print job needs a flash dryer. Those are project-specific tools, not the basics.
Rule: get the four basics first. Add accessories only when a specific project calls for them.
How does a teflon sheet fit into a heat press setup?
A teflon sheet sits between the hot platen and the design or over the garment to protect the press and the work surface. It's one of the few accessories you'll use on almost every project.
The YRYM PTFE sheet pack gives you three reusable sheets in a 16 x 20 inch size. That's larger than most flat press platens, so you can trim or fold a sheet to fit your design.
PTFE sheets resist heat up to 600 °F, well above the platen temperatures most HTV and sublimation projects use. They're non-stick and waterproof, so glue, wax and stray ink wipe off rather than soaking in.
Each sheet can be cut to size for smaller projects.
Placement matters. Put the sheet over the design to keep the platen clean, or under the garment to protect the base board.
Either way, the sheet stops dye from bleeding onto the press and keeps your next shirt clean.
If you want the full explanation of when to use one and when to skip it, our teflon sheet for heat press guide covers placement and reuse.
A teflon sheet also helps when you press polyester. Poly blends can get shiny under direct heat, and a sheet spreads the heat more evenly.
Our can you heat press polyester post explains the temperatures that keep poly looking right.
Rule: use a teflon sheet on every project unless the transfer maker says the design needs direct platen contact.
When should you use a heat press pillow?
Use a heat press pillow when the design crosses a seam, zipper, collar or thick hem. The pillow raises that area so the press can meet the fabric evenly instead of leaving a dented press line.
The SUNHE YHK four-pack gives you 5 x 5, 10 x 10, 12 x 15 and 5 x 15 inch pillows. Small pillows fit sleeves, pockets and baby bodysuits.
The larger ones suit shirts, hoodies, bags and pillow covers.
Each pillow has a non-stick PTFE cover over high-density foam. The cover resists sticking and scorching, and the foam lifts the fabric so seams sit flatter under the platen.
That helps HTV and screen print designs stick evenly with fewer harsh press lines.
The temperature limit matters. These pillows are rated to 428 °F, so they suit HTV, sublimation and screen print projects but not every specialty material.
Check your transfer maker's temperature before pressing on a pillow.
Place the pillow under the print area, not over the design. For a sleeve or a baby bodysuit, slide the pillow inside the garment so the fabric wraps around it.
For a collar or zipper, lay the pillow under the seam before closing the press.
Rule: use a pillow for any design that crosses a seam or thick edge. Skip it for flat, single-layer prints where the base board already gives an even surface.
What transfer materials and supplies should you have on hand?
You need at least one transfer material for your chosen craft: HTV for cut designs, sublimation paper for poly-blend blanks, or printable transfer paper for cotton. Add heat-resistant tape and a lint roller for prep.
The material depends on what you want to make. HTV suits shirts, bags and caps, and it's the most common beginner choice.
Sublimation works on polyester and coated blanks and gives full-color photos that won't peel. Printable transfer paper works on cotton shirts for one-off designs.
Buy small quantities at first. A sample pack lets you learn the temperature and pressure that works for each material before you commit to a roll.
HTV and transfer paper both behave differently on cotton, poly and blends.
Prep supplies worth keeping nearby
Heat-resistant tape holds the design in place so it doesn't shift when the press closes. A lint roller removes dust and fibers before you press.
A pair of tweezers or a small hook helps lift corners without burning your fingers.
Keep the prep area clean. Dust under a transfer shows up as a bump in the finished print.
A quick lint roll and a clear table make the difference between a smooth design and one with grit under it.
Rule: match the transfer material to the blank first. Then buy tape and a lint roller before starting a batch of projects.
How do you set temperature and time on a heat press?
Set temperature and time by the transfer material and the fabric, not by the press's default. Cotton HTV usually presses near 305 °F for 10 to 15 seconds, while sublimation on poly needs a higher temperature and longer time.
The Fancierstudio gives you electronic time and temperature control, so you can dial in exact settings. Set the temperature first and wait for the press to reach it before pressing.
Then set the timer and close the press for the full count.
Temperature ranges vary by material. Most cotton and poly-cotton shirts sit around 300 to 330 °F.
Sublimation on polyester blanks often needs 380 to 400 °F. Specialty materials like leather and nylon have their own numbers.
Temperature and time starting points
- Cotton HTV: about 305 °F for 10 to 15 seconds with medium pressure.
- Sublimation on poly: about 385 to 400 °F for 40 to 60 seconds.
- Printable transfer paper: follow the paper's chart, usually 350 to 375 °F for 20 to 30 seconds.
- Polyester blend shirts: lower end of the range to avoid shine and scorching.
These are starting points. The transfer maker's chart is the final word, because formulas change between brands.
Write down the settings that work so you can repeat them.
Rule: set the temperature for the material, not for the press. Wait for the platen to reach temperature before every press.
How much pressure does a heat press need for a clean transfer?
Use light to medium pressure for most HTV and sublimation projects. Enough to keep the fabric flat against the platen without crushing the design or leaving a shiny mark.
Pressure affects how the design bonds. Too little leaves the transfer sitting on top of the fibers and it peels after washing.
Too much crushes the fabric, makes the print look shiny or squeezes adhesive out around the edges.
The Fancierstudio has adjustable pressure, so you can set it once and lock it. A good starting point is the pressure that closes the press firmly but lets you still turn the knob.
Test on a scrap shirt before your real project.
Thick seams and layered designs need more pressure or a pillow to lift the fabric. Thin materials like performance poly need less.
Our heat press pressure settings guide walks through the light, medium and firm ranges by material.
Signs your pressure is off
If the design peels after washing, the pressure was too light. If the print looks shiny or the edges bleed, it was too heavy.
If a seam leaves a dent in the design, you needed a pillow.
Rule: set the pressure for the thickest part of the design. Test on a scrap piece before pressing a finished garment.
What kind of work surface and setup does a heat press need?
A heat press needs a flat, stable, heat-resistant surface large enough for the press and the garment. The press should sit level, away from walls and clutter, with room to open the platen fully.
The Fancierstudio is an upward-opening press that saves space. Its base board is silicon-gel and glued down, so it stays put during pressing.
The press measures 33 by 23 by 20 inches overall, so give it a dedicated spot.
A sturdy table rated for the press's weight matters. The press runs at 1800 watts and 110 volts, so the outlet needs to handle that load.
Keep the cord away from the pressing area and don't run the press on the same circuit as other high-draw appliances.
Clear the space around the press. The platen opens upward, so you need headroom and room to slide a garment in from the front.
A heat-resistant mat under the press protects the table from stray heat and spills.
Rule: set the press on a level, heat-resistant table with room to open the platen fully. Check the outlet and cord before the first press.
Which fabrics and blanks can you press safely?
You can press cotton, poly-cotton blends and most polyester blanks with the right temperature. Natural fibers like cotton take HTV well, while poly needs lower heat and a teflon sheet to avoid shine.
Cotton tolerates HTV heat easily. Polyester needs temperature control set by the method, whether HTV or sublimation.
Light-colored polyester or poly-coated blanks are the best blanks for sublimation, because the design shows clearly and the dye bonds to the fibers. Cotton takes HTV or printable transfer paper instead.
Polyester needs more care. It can scorch or get shiny above its heat limit, so lower the temperature and use a teflon sheet.
Polyester is the best base for sublimation, because the dye bonds to the fibers.
Blends sit in between. A 50/50 cotton-poly shirt presses at a moderate temperature and takes both HTV and some sublimation.
Test a hidden area before pressing the front.
Some materials need special handling. Nylon and spandex stretch under heat.
Leather and faux leather can scorch without a protective sheet. Dark colors show press marks more easily.
Rule: start with cotton for HTV and polyester for sublimation. Test any new fabric on a hidden spot before pressing the visible design.
How do you keep the press and accessories in good condition?
Keep the press and accessories in good shape by wiping the platen and teflon sheets after each session, storing sheets flat and checking the press base and cord regularly. Small habits prevent most damage.
The Teflon coating on the Fancierstudio platen needs a wipe after each press to remove ink and adhesive residue. A soft cloth and a little water handle most marks.
Avoid abrasive cleaners that scratch the coating.
Teflon sheets last a long time when you wipe them after use. Store them flat or rolled loosely so they don't crease.
A crease in the sheet shows up as a line in your pressed design.
Press pillows need the same care. Wipe the PTFE cover after use and store the set together so the sizes don't get mixed.
A marked pillow still works, but a clean cover keeps dye off your next garment.
Check the base board and cord every few sessions. The Fancierstudio's silicon-gel base is glued down, so it shouldn't shift.
A loose base or a frayed cord is a reason to stop pressing and fix it.
Rule: wipe the platen and sheets after every session. Store sheets flat and check the base and cord each week.
What do you need for a heat press machine when you start small?
If you're starting small, you need the press, one teflon sheet, one press pillow, your transfer material and a stable table. That's enough for your first shirts, bags and small gifts without buying extras you won't use yet.
A 15 x 15 press like the Fancierstudio covers most home projects. It handles adult shirts, tote bags and flat blanks, and its digital controls make temperature and time easy to set.
The Teflon-coated platen and adjustable pressure keep early projects forgiving.
The YRYM sheet pack gives you three sheets, so you can keep one on the press and one spare. The SUNHE YHK pillow set covers seams, collars and sleeves in four sizes.
Together they handle the accessories that matter most.
Add transfer material matched to your first project. A small HTV sample and a sheet of sublimation paper let you try both methods before buying in bulk.
When you're ready to expand, a second press size or a mug attachment opens more projects. Until then, the core kit does the job.
The key to what you need for a heat press machine is starting with the press, the protective sheet and the pillow, then adding tools as your projects grow.
Rule: buy the four basics first. Add a second press size or specialty attachment only when a project needs it.
Frequently asked questions
What do I need for a heat press machine besides the press itself?
You need a teflon sheet to protect the platen and your design, a press pillow for seams and zippers, your transfer paper or vinyl, and a flat heat-resistant work surface. A thermometer and spare heat-resistant tape help too.
Do I need a teflon sheet with a heat press?
Yes for most projects. A teflon sheet keeps the platen clean, stops dye from transferring back onto the press, and lets you press without a sticky layer between the design and the hot plate.
What temperature should I set my heat press to?
Set temperature by fabric and transfer type, not by the press. Cotton HTV usually presses around 305 °F and most cotton and polyester shirts sit near 300 to 330 °F, while heavier blends and specialty materials go higher.
Always follow the transfer maker's number.
Can I use a regular iron instead of a heat press?
A home iron works for small one-off HTV projects, but it can't hold even pressure or a steady temperature the way a press does. For repeated shirts, sublimation or anything with a large design, a press gives more consistent results.
What size heat press should I buy first?
A 15 x 15 inch press covers most adult shirts, tote bags and flat blanks without taking up much more room than a smaller model. Pick a smaller press only if your space is tight or you work mostly on baby clothes and sleeves.